How I Got Tripped Up Adding a Drive to a Synology NAS
Back up your data before doing anything
Data is priceless. Hard drives are not.
I ran into this while getting back into PT and doing some heavy downloading again. Space on the NAS started disappearing fast, so I added an 8TB IronWolf drive to make room.
The problem came from an earlier choice: the first drive had been set up as SHR. After inserting the second drive and expanding the first storage space, DSM automatically turned the setup into SHR with one-drive redundancy, which is effectively similar to RAID 1 in this case.
That meant my usable capacity did not really increase at all.
So the idea changed: instead of keeping that redundant layout, I wanted to downgrade the storage pool to SHR without redundancy so it would behave more like a single-disk setup, and then configure the second drive as its own Basic storage pool.
The advantage of doing it this way is pretty clear:
- important files stay on the first disk with physical separation
- PT downloads go to the second disk
- if more space is needed later, only that second pool needs to be expanded
- if a drive fails, only that disk is affected
What I did
1. Disable the newly added drive
Go to Storage Manager -> HDD/SSD -> select the new drive -> Action -> Deactivate Drive.
You can also shut the NAS down first, physically remove the new drive, and then boot it back up.
2. The original storage pool will show an error
At this point, the storage space you want to modify will report an abnormal state, shown as Degraded.
3. Enable SSH
Go to Control Panel -> Terminal & SNMP -> enable SSH service.
4. Log in and get root privileges
Use a tool such as MobaXterm to connect to the system, then switch to root:
sudo -i
5. Check the RAID information
Run:
cat /proc/mdstat
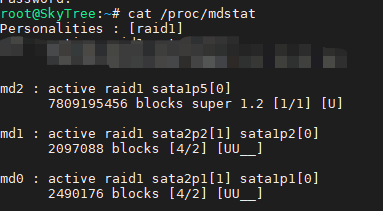
As shown above, the largest array, usually md2, is the one that needs to be changed. md0 is the system partition, and md1 is the swap partition.
6. Downgrade the array
I did not keep a screenshot of this step, so here it is as a text note.
After running the command below, the system will display something like: raid disks for /dev/md2 set to 1
mdadm --grow --raid-devices=1 --force /dev/md2
7. Check the storage status again
After that, the degraded status should return to normal.
Whether it shows up as Basic or SHR without redundancy depends on how the storage pool was originally created. From there, you can decide for yourself whether to create a new storage pool or merge storage space in another way.
One more important note
Back up your data. Really.
There is also one limitation worth mentioning: if the storage pool itself was originally created as SHR, this method cannot truly convert it back into Basic.
If you absolutely want a real Basic pool, one possible approach would be:
- follow the same process above first
- create a new Storage Pool 2
- copy all data from Storage Pool 1 to it
- make sure to separately back up Docker data and any Synology packages that cannot be cleanly backed up
- delete Storage Pool 1
- then add the old disk into the new setup
And if you are particular about pool numbering, you could even rebuild the old drive as Storage Pool 1 first and then copy everything back.
That said, this last part is only an idea and was not tested. Treat it carefully.