Building a Desktop Video Calling App with WebRTC and Electron
Testing audio and video communication through an EasyRTC demo is enough to prove that peer-to-peer video can work, but it does not automatically make the underlying WebRTC flow feel clear. At that point there are usually two ways to keep learning: dig into the EasyRTC framework itself, or go straight to the WebRTC APIs and build the signaling and connection process by hand.
I chose the second path. It is much easier to use a technology confidently later when the mechanics behind it are no longer a black box. After working through the basics earlier, reading the official WebRTC examples and debugging them became much more manageable.
Starting from the official WebRTC sample
A good entry point is the peer connection sample:
https://webrtc.github.io/samples/src/content/peerconnection/pc1/
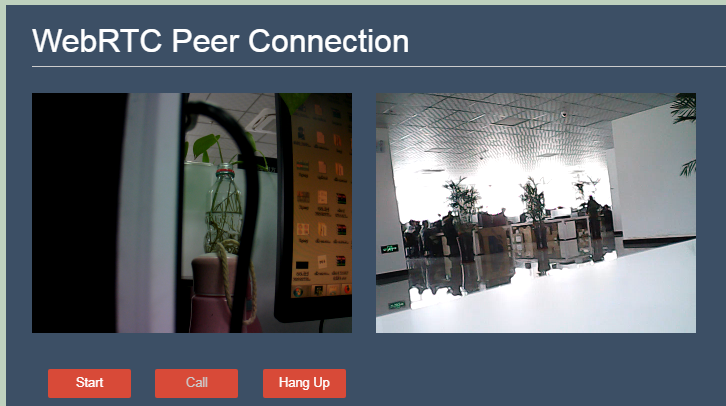
That example simulates two machines establishing a peer-to-peer connection while showing both video streams on a single page. To make it usable across two real computers, I modified the code by introducing socket.io to relay signaling data between the peers. If two machines are going to communicate, it makes more sense to let them negotiate remotely rather than only simulate both sides in one browser page.
What the modified version does
The basic behavior is straightforward:
- Clicking Start turns on the local camera and puts the app into a ready state, able to receive remote video.
- Clicking Call initiates the video connection.
- Clicking Hang Up stops receiving the remote video stream.
If both PC1 and PC2 click Start, and then PC1 clicks Call, the peer connection can be established.
One detail is easy to underestimate: a TURN/STUN server is required. localPeerConnection relies on ICE to select and coordinate a route through the available STUN/TURN services. Even on a local network, leaving that out prevents the connection from being established. A coTurn server can be used for this part.
How the WebRTC connection flow works
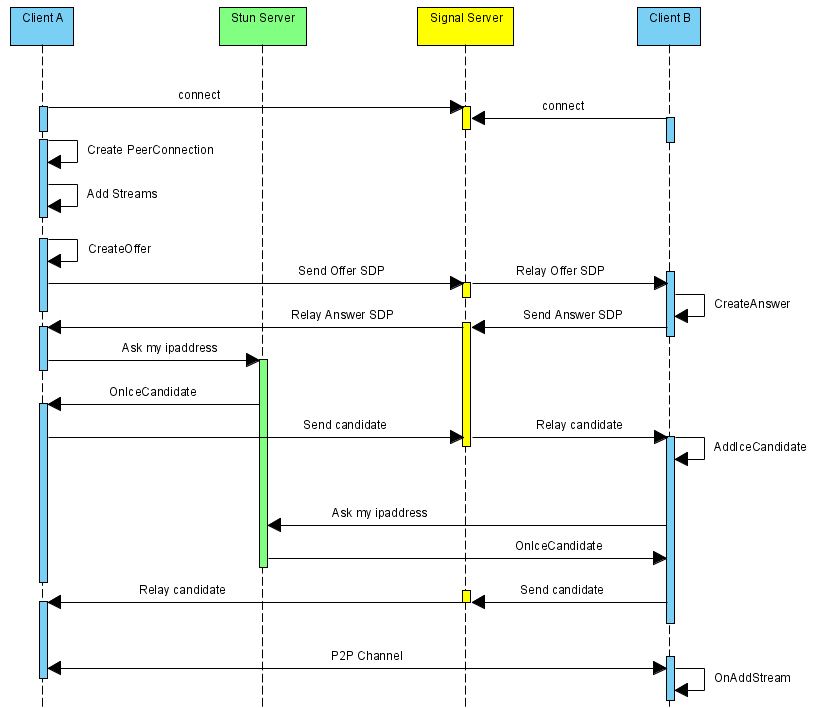
At the core of the process is RTCPeerConnection, which creates the channel used to prepare peer-to-peer communication. When the connection is initialized, TURN/STUN server information is provided, and ICE begins gathering candidate paths for connectivity. That is essentially the candidate negotiation process used to punch through the network path.
Once an RTCPeerConnection instance is created, it listens for the icecandidate event. ICE gradually returns path information to the client through that event handler. When PC1 receives an icecandidate, it needs to pass that candidate to PC2. After PC2 has initialized its own RTCPeerConnection, it can receive PC1's candidate data and add it through addIceCandidate. socket.io works well for relaying these candidate messages.
After that, the local audio and video tracks are acquired and added to localPeerConnection. These tracks are the media streams that will eventually be sent over the peer connection.
When Call is clicked, PC1 uses createOffer to generate its SDP. SDP is descriptive text that explains what media the peer wants to send, what tracks are included, what codecs are supported, and other session details.
...
a=group:BUNDLE audio video
a=msid-semantic: WMS HNWGnpqStY44w8vHQZ3BE1VsRXmuajjk1pXm uQXvAPEH23ysg7WvwxKVmyzdZchzQpwGYTd9

m=audio 9 UDP/TLS/RTP/SAVPF 111 103 104 9 0 8 106 105 13 110 112 113 126
c=IN IP4 0.0.0.0
a=rtcp:9 IN IP4 0.0.0.0
a=ice-ufrag:suJZ
a=ice-pwd:JLjmrwlB12Tr9MJb6B/WGQwy
a=ice-options:trickle
a=fingerprint:sha-256 80:DD:A7:A8:D4:16:CA:9B:1F:79:9A:0D:7B:05:EA:E7:35:FD:11:6F:B8:69:C0:57:0F:77:2B:D2:AE:0B:02:E3
a=setup:actpass
a=mid:audio
a=extmap:1 urn:ietf:params:rtp-hdrext:ssrc-audio-level
a=sendrecv
...
a=ssrc:3174753737 cname:u6uhaN/KTBYk6jwt
a=ssrc:3174753737 msid:uQXvAPEH23ysg7WvwxKVmyzdZchzQpwGYTd9 f595523e-2fcd-400f-992e-0a127753952f
a=ssrc:3174753737 mslabel:uQXvAPEH23ysg7WvwxKVmyzdZchzQpwGYTd9
a=ssrc:3174753737 label:f595523e-2fcd-400f-992e-0a127753952f
a=ssrc:1773101601 cname:u6uhaN/KTBYk6jwt
a=ssrc:1773101601 msid:HNWGnpqStY44w8vHQZ3BE1VsRXmuajjk1pXm bbf350aa-714c-40f2-a646-6d235d154086
a=ssrc:1773101601 mslabel:HNWGnpqStY44w8vHQZ3BE1VsRXmuajjk1pXm
a=ssrc:1773101601 label:bbf350aa-714c-40f2-a646-6d235d154086
A related reference here is the "Unified Plan" transition guide.
After PC2 receives PC1's Offer SDP, it calls setRemoteDescription to place that Offer into its own localPeerConnection. PC2 then generates its Answer SDP, stores that with setLocalDescription, and sends the Answer back to PC1 through socket.io.
At that point, PC1 has already added its own SDP and now also receives PC2's SDP, so localPeerConnection ends up containing the remote side's path information together with both peers' SDP descriptions.
When the track event is triggered on the localPeerConnection instances for PC1 and PC2, the remote video can be obtained and the peer-to-peer connection is effectively complete.
One practical note: the flow chart and the code may not line up perfectly in strict order. SDP and candidate messages do not have to follow one rigid sequence. As long as both are delivered to the other side correctly, the negotiation can succeed.
Running a coTurn server with Docker
The image used here is:
https://hub.docker.com/r/instrumentisto/coturn
Create a file named my.conf:
listening-ip=172.27.0.3
listening-port=3478
relay-ip=172.27.0.3
external-ip=118.24.101.22
relay-threads=500
lt-cred-mech
pidfile="/var/run/turnserver.pid"
min-port=49152
max-port=65535
user=username:123456
realm=Aha
Here, 172.27.0.3 is the server's private network address, and 118.24.101.22 is the public address.
After coTurn is installed, it supports both STUN and TURN. The STUN address is stun:118.24.101.22:3478, while TURN requires authentication and uses turn:118.24.101.22:3478.
Start the container with:
docker run -d --network=host --name=coturn -v $(pwd)/my.conf:/etc/coturn/turnserver.conf instrumentisto/coturn --no-cli
Why Electron is a practical wrapper for WebRTC
Electron is essentially Chromium packaged as a desktop runtime. If a completed WebRTC page is wrapped and run inside Electron, there are several practical advantages.
- It can be distributed as a desktop application, which makes the overall feature set more flexible.
- If the camera access code is loaded from a remote page, the page normally has to be served over HTTPS, or it must be a localhost page. In a LAN environment, deploying HTTPS with a self-signed certificate is often unnecessary overhead. Even if the certificate is trusted, browsers may still show security warnings. Loading
index.htmldirectly in Electron avoids that issue. - After Electron starts, opening the camera does not trigger the same permission prompt behavior commonly seen in browsers, which is very convenient in practice.
That covers the basic peer-to-peer setup between two hosts. If a third computer joins the communication, a new RTCPeerConnection has to be created and the same negotiation process needs to be repeated for that peer.