JavaScript Animation Basics: offset, client, scroll, and Common UI Effects
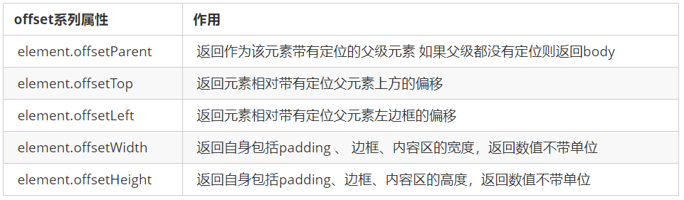
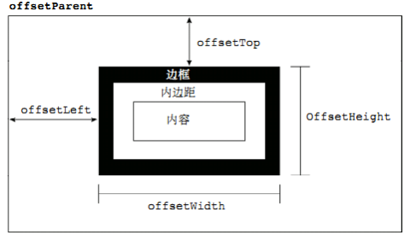
Understanding the offset family
In JavaScript, offset is used to get an element’s position and dimensions dynamically. It is especially useful when you need to know where an element sits relative to its positioned parent, or how large the element actually is.
With the offset properties, you can typically get:
- the distance between an element and its positioned parent
- the element’s own width and height
- numeric values without units
offset vs style
These two are often used together, but they solve different problems.
offset
offsetcan read values that come from any stylesheet- values returned by the
offsetseries do not include units offsetWidthincludespadding + border + width- properties such as
offsetWidthare read-only, so they can only be retrieved, not assigned
So when the goal is to measure an element’s size or position, offset is usually the better tool.
style
styleonly reads inline stylesstyle.widthreturns a string with a unitstyle.widthdoes not includepaddingorborderstyle.widthis readable and writable
So if you want to change a value, use style.
Example: get mouse coordinates inside a box
A common task is figuring out where the mouse is inside a container.
The idea is simple:
- get the mouse position on the page using
e.pageXande.pageY - get the box position on the page using
offsetLeftandoffsetTop - subtract the box position from the mouse position
- the result is the mouse coordinate inside the box itself
- if you want the value to keep updating, listen for
mousemove
var box = document.querySelector('.box');
box.addEventListener('mousemove', function(e) {
var x = e.pageX - this.offsetLeft;
var y = e.pageY - this.offsetTop;
this.innerHTML = 'x坐标是' + x + ' y坐标是' + y;
})
Building a draggable modal
A popup dialog is also often called a modal.
The interaction here includes several parts:
- clicking a trigger displays the modal
- a semi-transparent mask appears behind it
- clicking the close button hides both the modal and the mask
- dragging the top bar moves the modal around the page
- releasing the mouse stops the dragging behavior
How the drag logic works
The dragging process follows the familiar mouse sequence:
mousedownmousemovemouseup
The key point is that the modal should not snap its top-left corner directly to the mouse pointer. Instead, you first record where the mouse is inside the box when the user presses down. After that, every new mouse position is offset by that internal distance.
In practice:
- clicking the trigger sets the mask and modal to
display: block - clicking the close button sets both to
display: none - dragging starts on the title bar, here identified by
#title - on
mousedown, calculate the mouse offset inside the modal - on
mousemove, update the modal’sleftandtop - on
mouseup, remove the move listener so dragging stops
// 1. 获取元素
var login = document.querySelector('.login');
var mask = document.querySelector('.login-bg');
var link = document.querySelector('#link');
var closeBtn = document.querySelector('#closeBtn');
var title = document.querySelector('#title');
// 2. 点击弹出层这个链接 link  让mask 和login 显示出来
link.addEventListener('click', function() {
    mask.style.display = 'block';
    login.style.display = 'block';
})
// 3. 点击 closeBtn 就隐藏 mask 和 login
closeBtn.addEventListener('click', function() {
    mask.style.display = 'none';
    login.style.display = 'none';
})
// 4. 开始拖拽
// (1) 当我们鼠标按下, 就获得鼠标在盒子内的坐标
title.addEventListener('mousedown', function(e) {
    var x = e.pageX - login.offsetLeft;
    var y = e.pageY - login.offsetTop;
    // (2) 鼠标移动的时候,把鼠标在页面中的坐标,减去 鼠标在盒子内的坐标就是模态框的left和top值
    document.addEventListener('mousemove', move)

    function move(e) {
        // 注意单位‘px’!!!
        login.style.left = e.pageX - x + 'px';
        login.style.top = e.pageY - y + 'px';
    }
    // (3) 鼠标弹起,就让鼠标移动事件移除
    document.addEventListener('mouseup', function() {
        document.removeEventListener('mousemove', move);
    })
})
Magnifier effect for product images
A typical image zoom feature can be divided into three parts:
- show and hide the overlay and the large preview box
- make the yellow overlay follow the mouse
- move the large image in sync with the overlay
Core idea
It is not correct to assign the mouse coordinate directly to the overlay, because the overlay is positioned relative to its parent box. So the process is:
- find the mouse position inside the small image box
- assign that position to the overlay’s
leftandtop - subtract half of the overlay’s own width and height so it centers under the cursor
- clamp the overlay so it never leaves the small image area
- map the overlay movement proportionally to the movement of the large image
The overlay’s maximum travel distance is:
- small image box width minus overlay width
The large image movement is computed as:
- overlay movement × large image max movement ÷ overlay max movement
window.addEventListener('load', function() {
    var preview_img = document.querySelector('.preview_img');
    var mask = document.querySelector('.mask');
    var big = document.querySelector('.big');
    // 1. 当我们鼠标经过 preview_img 就显示和隐藏 mask 遮挡层 和 big 大盒子
    preview_img.addEventListener('mouseover', function() {
        mask.style.display = 'block';
        big.style.display = 'block';
    })
    preview_img.addEventListener('mouseout', function() {
            mask.style.display = 'none';
            big.style.display = 'none';
        })
        // 2. 鼠标移动的时候,让黄色的盒子跟着鼠标来走
    preview_img.addEventListener('mousemove', function(e) {
        // (1). 先计算出鼠标在盒子内的坐标
        var x = e.pageX - this.offsetLeft;
        var y = e.pageY - this.offsetTop;
        // console.log(x, y);
        // (2) 减去盒子高度 300的一半 是 150 就是我们mask 的最终 left 和top值了
        // (3) 我们mask 移动的距离
        var maskX = x - mask.offsetWidth / 2;
        var maskY = y - mask.offsetHeight / 2;
        // (4) 如果x 坐标小于了0 就让他停在0 的位置
        // 遮挡层的最大移动距离
        var maskMax = preview_img.offsetWidth - mask.offsetWidth;
        if (maskX <= 0) {
            maskX = 0;
        } else if (maskX >= maskMax) {
            maskX = maskMax;
        }
        if (maskY <= 0) {
            maskY = 0;
        } else if (maskY >= maskMax) {
            maskY = maskMax;
        }
        mask.style.left = maskX + 'px';
        mask.style.top = maskY + 'px';
        // 3. 大图片的移动距离 = 遮挡层移动距离 * 大图片最大移动距离 / 遮挡层的最大移动距离
        // 大图
        var bigIMg = document.querySelector('.bigImg');
        // 大图片最大移动距离
        var bigMax = bigIMg.offsetWidth - big.offsetWidth;
        // 大图片的移动距离 X Y
        var bigX = maskX * bigMax / maskMax;
        var bigY = maskY * bigMax / maskMax;
        bigIMg.style.left = -bigX + 'px';
        bigIMg.style.top = -bigY + 'px';

    })

})
A more compact version organizes the same behavior a bit more clearly:
window.addEventListener('load', function() { // 在页面加载完毕执行js代码
    // 获取页面元素
    var imgBox = this.document.querySelector('.preview_img'),
        mask = this.document.querySelector('.mask'),
        bigImgBox = this.document.querySelector('.big');

    // 鼠标移动到imgBox时显示mask与大盒子
    imgBox.addEventListener('mouseover', function() {
        mask.style.display = 'block';
        bigImgBox.style.display = 'block';
    })

    // 鼠标移出盒子,让mask与大盒子消失
    imgBox.addEventListener('mouseout', function() {
        mask.style.display = 'none';
        bigImgBox.style.display = 'none';
    })

    // 当鼠标在大盒子内移动时,激发响应事件
    imgBox.addEventListener('mousemove', function() {
        // x,y为鼠标在大盒子中的相对坐标位置
        var x = event.pageX - this.offsetLeft;
        var y = event.pageY - this.offsetTop;

        // 获取遮罩在盒子内的移动距离与大盒子内照片的移动距离的比值
        var smallImgDistance = this.offsetWidth - mask.offsetWidth;
        var bigImgDistance = bigImgBox.children[0].offsetWidth - bigImgBox.offsetWidth;
        var imgScale = bigImgDistance / smallImgDistance;

        // 为了防止遮罩mask移动过程中溢出盒子,对边缘情况进行处理
        if (x < mask.offsetWidth / 2) {
            mask.style.left = '0px'; // 当鼠标位置小于mask的宽度一半时,mask距离成“定值”
            bigImgBox.children[0].style.left = '0px';
        } else if ((this.offsetWidth - x) < mask.offsetWidth / 2) {
            mask.style.left = this.offsetWidth - mask.offsetWidth + 'px'; // 当鼠标位置大于mask与盒子的宽度差值时,mask距离成“定值”
            bigImgBox.children[0].style.left = -(this.offsetWidth - mask.offsetWidth) * imgScale + 'px';
        } else {
            mask.style.left = x - mask.offsetWidth / 2 + 'px'; //mask在中间活动,定位自动计算
            bigImgBox.children[0].style.left = -(x - mask.offsetWidth / 2) * imgScale + 'px';
        }

        if (y < mask.offsetHeight / 2) {
            mask.style.top = '0px';
            bigImgBox.children[0].style.top = '0px';
        } else if ((this.offsetHeight - y) < mask.offsetHeight / 2) {
            mask.style.top = this.offsetHeight - mask.offsetHeight + 'px';
            bigImgBox.children[0].style.top = -(this.offsetHeight - mask.offsetHeight) * imgScale + 'px';
        } else {
            mask.style.top = y - mask.offsetHeight / 2 + 'px';
            bigImgBox.children[0].style.top = -(y - mask.offsetHeight / 2) * imgScale + 'px';
        }
    })
})
The if conditions above can also be written with ternary operators:
x < mask.offsetWidth / 2 ? mask.style.left = '0px' :
    (this.offsetWidth - x) < mask.offsetWidth / 2 ? mask.style.left = this.offsetWidth - mask.offsetWidth + 'px' :
    mask.style.left = x - mask.offsetWidth / 2 + 'px';

y < mask.offsetHeight / 2 ? mask.style.top = '0px' :
            (this.offsetHeight - y) < mask.offsetHeight / 2 ? mask.style.top = this.offsetHeight - mask.offsetHeight + 'px' :
            mask.style.top = y - mask.offsetHeight / 2 + 'px';
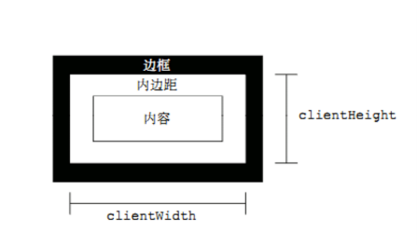
The client family: visible area measurements
client refers to the visible area of an element. These properties are commonly used when you need to measure the visible size of an element or inspect border-related dimensions.
Through the client series, you can dynamically obtain information such as:
- element dimensions inside the visible area
- border-related measurements

The scroll family: size and scrolling distance
scroll is used for information related to content that can move inside an element or page. These properties are useful when you want to know how much content exists, or how far something has been scrolled.
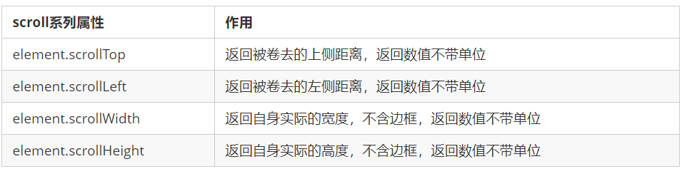
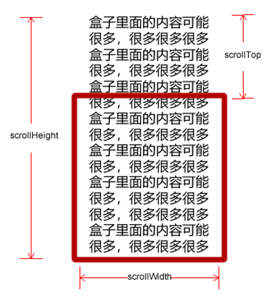
What is the page’s scrolled top distance?
When the browser window is not tall or wide enough to show the entire page, scrollbars appear automatically. As the page scrolls downward, the portion hidden above the viewport is the page’s scrolled top distance.
Scrolling triggers the onscroll event.
Example: fixed sidebar effect like an e-commerce page
This pattern usually works like this:
- the sidebar starts with absolute positioning
- once the page scrolls to a certain point, the sidebar switches to fixed positioning
- when the user scrolls farther, a “back to top” button appears
Analysis
To implement this:
- listen for the page scroll event, so the event source is
document - determine whether the page has scrolled past a target point
- the page’s scrolled top distance can be obtained with
window.pageYOffset - for an element’s own scrolled top value, use
element.scrollTop - the threshold often comes from another element’s
offsetTop
  //1. 获取元素
var sliderbar = document.querySelector('.slider-bar');
var banner = document.querySelector('.banner');
// banner.offestTop 就是被卷去头部的大小 一定要写到滚动的外面
var bannerTop = banner.offsetTop
// 当我们侧边栏固定定位之后应该变化的数值
var sliderbarTop = sliderbar.offsetTop - bannerTop;
// 获取main 主体元素
var main = document.querySelector('.main');
var goBack = document.querySelector('.goBack');
var mainTop = main.offsetTop;
// 2. 页面滚动事件 scroll
document.addEventListener('scroll', function() {
    // console.log(11);
    // window.pageYOffset 页面被卷去的头部
    // console.log(window.pageYOffset);
    // 3 .当我们页面被卷去的头部大于等于了 172 此时 侧边栏就要改为固定定位
    if (window.pageYOffset >= bannerTop) {
        sliderbar.style.position = 'fixed';
        sliderbar.style.top = sliderbarTop + 'px';
    } else {
        sliderbar.style.position = 'absolute';
        sliderbar.style.top = '300px';
    }
    // 4. 当我们页面滚动到main盒子,就显示 goback模块
    if (window.pageYOffset >= mainTop) {
        goBack.style.display = 'block';
    } else {
        goBack.style.display = 'none';
    }

})
Cross-browser way to read page scroll position
The page’s scrolled top value has compatibility differences, so several properties may be used depending on the environment:
- with a declared DTD, use
document.documentElement.scrollTop - without a declared DTD, use
document.body.scrollTop - the newer approach is
window.pageYOffsetandwindow.pageXOffset, supported from IE9 onward
function getScroll() {
    return {
      left: window.pageXOffset || document.documentElement.scrollLeft || document.body.scrollLeft||0,
      top: window.pageYOffset || document.documentElement.scrollTop || document.body.scrollTop || 0
    };
 }
使用的时候  getScroll().left
Quick comparison of the three major DOM measurement groups
In day-to-day development, these three groups are usually used for different purposes:
offsetis commonly used to get position, such asoffsetLeftandoffsetTopclientis commonly used to get visible size, such asclientWidthandclientHeightscrollis commonly used to get scroll distance, such asscrollTopandscrollLeft- page scroll distance is typically read through
window.pageXOffsetorwindow.pageYOffset
mouseenter vs mouseover
These two events look similar, but they do not behave the same way.
mouseenterfires when the mouse enters the elementmouseoveris similar, but it also fires again when the pointer moves over child elementsmouseenteronly fires when entering the element itself- the reason is that
mouseenterdoes not bubble mouseleave, often paired withmouseenter, also does not bubble
Encapsulating a basic animation function
The basic animation principle
The core idea behind simple JavaScript animation is straightforward: repeatedly update an element’s position with setInterval().
The usual steps are:
- get the element’s current position
- add a movement distance to that current position
- repeat the update with a timer
- stop the timer once the target condition is met
- make sure the element is positioned, otherwise
element.style.leftwill not work as expected
Give each animated element its own timer
If several elements all use the same animation function, declaring a separate timer every time can get messy. A practical pattern is to store a timer directly on each element.
Because JavaScript is dynamic, you can add properties directly to an object, including DOM elements. That lets every animated element manage its own timer.
 function animate(obj, target) {
            // 当我们不断的点击按钮,这个元素的速度会越来越快,因为开启了太多的定时器
            // 解决方案就是 让我们元素只有一个定时器执行
            // 先清除以前的定时器,只保留当前的一个定时器执行
            clearInterval(obj.timer);
            obj.timer = setInterval(function() {
                if (obj.offsetLeft >= target) {
                    // 停止动画 本质是停止定时器
                    clearInterval(obj.timer);
                }
                obj.style.left = obj.offsetLeft + 1 + 'px';

            }, 30);
        }
A small practical extension of the same idea is animating the position of a comment form when an input gains or loses focus:
var form = document.querySelector('#comment-form');
form.children[1].children[0].addEventListener('focus', function() {
    clearInterval(this.timer);
    var distance = -60;
    this.timer = setInterval(function() {
        if (distance >= 0) {
            clearInterval(this.timer);
        } else {
            distance += 2;
            form.children[2].style.top = distance + 'px';
        }
    }, 10)
})
form.children[1].children[0].addEventListener('blur', function() {
    clearInterval(this.timer);
    var distance = 0;
    this.timer = setInterval(function() {
        if (distance <= -60) {
            clearInterval(this.timer);
        } else {
            distance -= 2;
            form.children[2].style.top = distance + 'px';
        }
    }, 10)
})
These APIs and patterns form the groundwork for many common interface effects in vanilla JavaScript. Once offset, client, and scroll are clear, it becomes much easier to build drag interactions, magnifiers, floating sidebars, and simple motion effects from scratch.