Adding Basic Auth to a WordPress Site: a Simple Extra Layer Against Login Scans
These past few days, my blog has been getting scanned by random people trying to hit the admin login and reset the administrator password. The site doesn’t really have anything valuable, so even if it were compromised there wouldn’t be much to lose, but the scanning itself is annoying enough to make me want to tighten things up.
The overall plan came down to three parts: adding Alibaba Cloud ESA WAF and origin protection, hardening WordPress weak points, and adding an extra verification layer. ESA itself isn’t something I’ll go into here, since not many people may be using it and each CDN has its own setup differences. What I want to focus on is the WordPress hardening side and the extra authentication layer I ended up using.
1. Fix the obvious weak spots in the theme
<table> <thead> <tr> <th>Fix</th> <th>Severity</th> <th>Notes</th> </tr> </thead> <tbody> <tr> <td>Unify login error messages</td> <td>Critical</td> <td>Always return “login information is incorrect” no matter whether the username exists, so attackers can’t enumerate usernames from error messages</td> </tr> <tr> <td>Remove password reset</td> <td>Critical</td> <td>Remove the password recovery flow to keep people from repeatedly hammering it</td> </tr> <tr> <td>Add login failure lockout</td> <td>Critical</td> <td>Increase the IP lockout duration as login failures pile up</td> </tr> <tr> <td>Add a captcha on login</td> <td>Critical</td> <td>Replace the simple arithmetic captcha with an image-based arithmetic captcha to make machine recognition harder; this requires OCR and increases cost</td> </tr> <tr> <td>Remove the WordPress version number</td> <td>High</td> <td>Strip thever= parameter from the login page and all frontend CSS/JS</td>
</tr>
<tr>
<td>Remove the REST API Link header</td>
<td>High</td>
<td>Stop exposing the wp-json endpoint in HTTP response headers</td>
</tr>
<tr>
<td>Delete readme.html and license.txt</td>
<td>High</td>
<td>These files expose the WordPress version</td>
</tr>
<tr>
<td>Hide author names in RSS feeds</td>
<td>Medium</td>
<td>Show “Author” in the feed instead of the real nickname</td>
</tr>
<tr>
<td>Remove the theme name from body classes</td>
<td>Low</td>
<td>Stop exposing wp-theme-nickel</td>
</tr>
<tr>
<td>Remove the language switcher on the login page</td>
<td>Low</td>
<td>Reduce the attack surface</td>
</tr>
</tbody>
</table>
2. Add another authentication layer
There are basically two ways to do this. One is 2FA, such as a time-based code synced with a phone app, or a 6-digit code sent by email, so the WordPress password and the dynamic code work together as a two-step check. The other is to add an Nginx Basic Auth password. In practice, that means when someone visits sensitive pages like the login screen, a separate login prompt appears first, and only after passing that prompt can they reach the real WordPress login page.
I ended up choosing Basic Auth for three reasons. First, 2FA is usually heavier and the plugins tend to be bulky, and I didn’t want the site loading that much extra stuff. Second, I needed protection not just for the login page but also for the /wp-admin/ directory, and the lighter 2FA options I looked at didn’t really cover that. Third, Basic Auth is handled entirely by Nginx, so it adds the least overhead and is easier to keep alive even if the box gets hammered. If you lean toward a 2FA setup instead, the wp 2FA plugin is worth considering.
After Basic Auth is in place, the prompt looks like this:
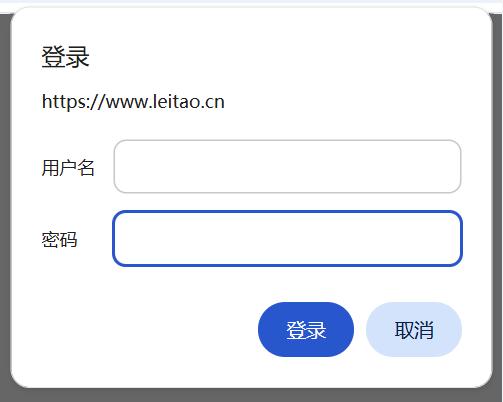
Below are the full deployment steps.
1. Add the following to your Nginx config
Make sure this goes before include enable-php-83.conf. The reason is that among regex locations, the one defined first takes priority. If location ~ \.php$ from enable-php-83.conf comes first, it will match /wp-admin/index.php before your auth rule gets a chance, and auth_basic will be bypassed. So location ~ ^/wp-admin/.*\.php has to be placed ahead of it.
Add this:
NGINX复制
============= ★ 新增:Basic Auth 保护 wp-admin 和 wp-login =============

# 1) 登录页加密(精确匹配,优先级最高,不被任何正则覆盖)

location = /wp-login.php {

auth_basic “Restricted”;

auth_basic_user_file /www/server/nginx/htpasswd/wp-auth;

try_files $uri =404;

fastcgi_pass unix:/tmp/php-cgi-83.sock;

include fastcgi_params;

fastcgi_param SCRIPT_FILENAME $document_root$fastcgi_script_name;

}

# 2) wp-admin 下 PHP 文件加密(正则,必须在 enable-php-83 之前定义)

location ~ ^/wp-admin/.*\.php(/|$) {

auth_basic “Restricted”;

auth_basic_user_file /www/server/nginx/htpasswd/wp-auth;

try_files $uri =404;

fastcgi_pass unix:/tmp/php-cgi-83.sock;

include fastcgi_params;

fastcgi_param SCRIPT_FILENAME $document_root$fastcgi_script_name;

}

# 3) 放行 admin-ajax.php(精确匹配,优先级高于上面的正则)

location = /wp-admin/admin-ajax.php {

auth_basic off;

try_files $uri =404;

fastcgi_pass unix:/tmp/php-cgi-83.sock;

include fastcgi_params;

fastcgi_param SCRIPT_FILENAME $document_root$fastcgi_script_name;

}

# ============= ★ Basic Auth 结束 =============
2. Create the password directory
mkdir -p /www/server/nginx/htpasswd
3. Install the htpasswd tool
# CentOS / AlmaLinux / Rocky
yum install -y httpd-tools

# Ubuntu / Debian
apt install -y apache2-utils
4. Create the password file and user
# -c means create a new file (first use only)
# Replace admin with the username you want
htpasswd -c /www/server/nginx/htpasswd/wp-auth admin
You’ll be prompted to enter the password twice:
New password: ********
Re-type new password: ********
Adding password for user admin
5. Add a second user if needed
# Be careful not to add -c here, or you’ll overwrite the existing users
htpasswd /www/server/nginx/htpasswd/wp-auth user2
6. Check the password file
cat /www/server/nginx/htpasswd/wp-auth
You should see something like this, with the username and hashed password:
admin:$apr1$Xk7Zb2Qw$LmN3R4h5K6j7P8qRs9TtU0
7. Set file permissions
chown www:www /www/server/nginx/htpasswd/wp-auth
chmod 640 /www/server/nginx/htpasswd/wp-auth
8. Test Nginx and reload it
nginx -t
Once you see syntax is ok and test is successful, run:
nginx -s reload
3. The stronger setup
The strongest setup is probably CDN-side WAF + CDN origin protection, where only CDN nodes can fetch content from the origin, plus bot blocking at the CDN layer, site hardening, 2FA, and Basic Auth as a lightweight alternative. If you have a fixed IP, you could even allow only your own IP to reach sensitive pages. But the more rules you stack up, the more work a small site becomes: it’s easier to make mistakes, and migrations or server changes take more effort. So if you’re not being bothered, CDN-side WAF alone is still the cleanest choice.
I’ve never really used a static blog setup before. I wonder if that would make all of this go away.
For a personal blog, this kind of effort really shouldn’t be necessary. But there are always people who do pointless things that hurt everyone else and help no one, and in the end even someone like me, who barely knows the technical side, has to spend time learning how to keep a site in shape.